Kasumi Lighting Model
Introduction & Motivation
Kasumi Lighting Model is "General" stylized render pipeline for Unity written in HLSL, Shaderlab and C#.
As I began to study the code / shadergraph by fellow technical artists, I encountered a pervasive issue: while the code was functionally correct, its structure often neglected key principles revered in software engineering. These principles— abstraction, cohesion, low coupling, and modularization—are essential for creating code that is flexible and maintainable. The absence of these attributes in code led to challenges in reuse, debugging, modification, feature augmentation, and optimization . Motivated by this gap, I started the project with a clear goal: to introduce the discipline of software development engineering the technical artistry.
To achieve this, I began by establishing clear abstractions for each constituent element that shapes an "art style". This segmentation allowed for a more granular approach to artistic expression, where individual components could be independently developed and refined without disrupting the integrity of the overall design. By doing so, I not only improved the scalability of art production but also enabled a more collaborative environment where artists and engineers could contribute their expertise in concert, thereby elevating the quality and efficiency of the development process. This, I believe, is the key role of technical artists.
The work is also a demonstration of my ability to write shader code, my understanding in GPU workflow and Unity render pipeline; and also a personal interest inspired by all the visually appealing stylized games I played.
Demo
All the styles in the demo are created with a single Kasumi Lighting Model instance, by changing the parameters of different style sub-components.
Design and Implementation
Style Component Abstraction
My abstraction model contains four main categories (the lighting, the shading, the effects and additional components) and each contains several sub-components:
- Custom Ray Diffusion Model and Color Model
- Stylized Metallic, smoothness, Clear Coat and BRDF
- Ambient Occlusion and Global Illumination
- Alpha map, normal map, specular map...
- Transparency and Alpha cutout, culling
- Layer Blending
- Custom Object Outline
- Custom Shadow
- Autofill surface with grass/snow/sand..
- Color Interpolation
- Vertex Animation
- Stylized Water
- Depth Fog
- Bidirectional Gaussian Blur Post Processing
Pipeline Architecture & Data Flow
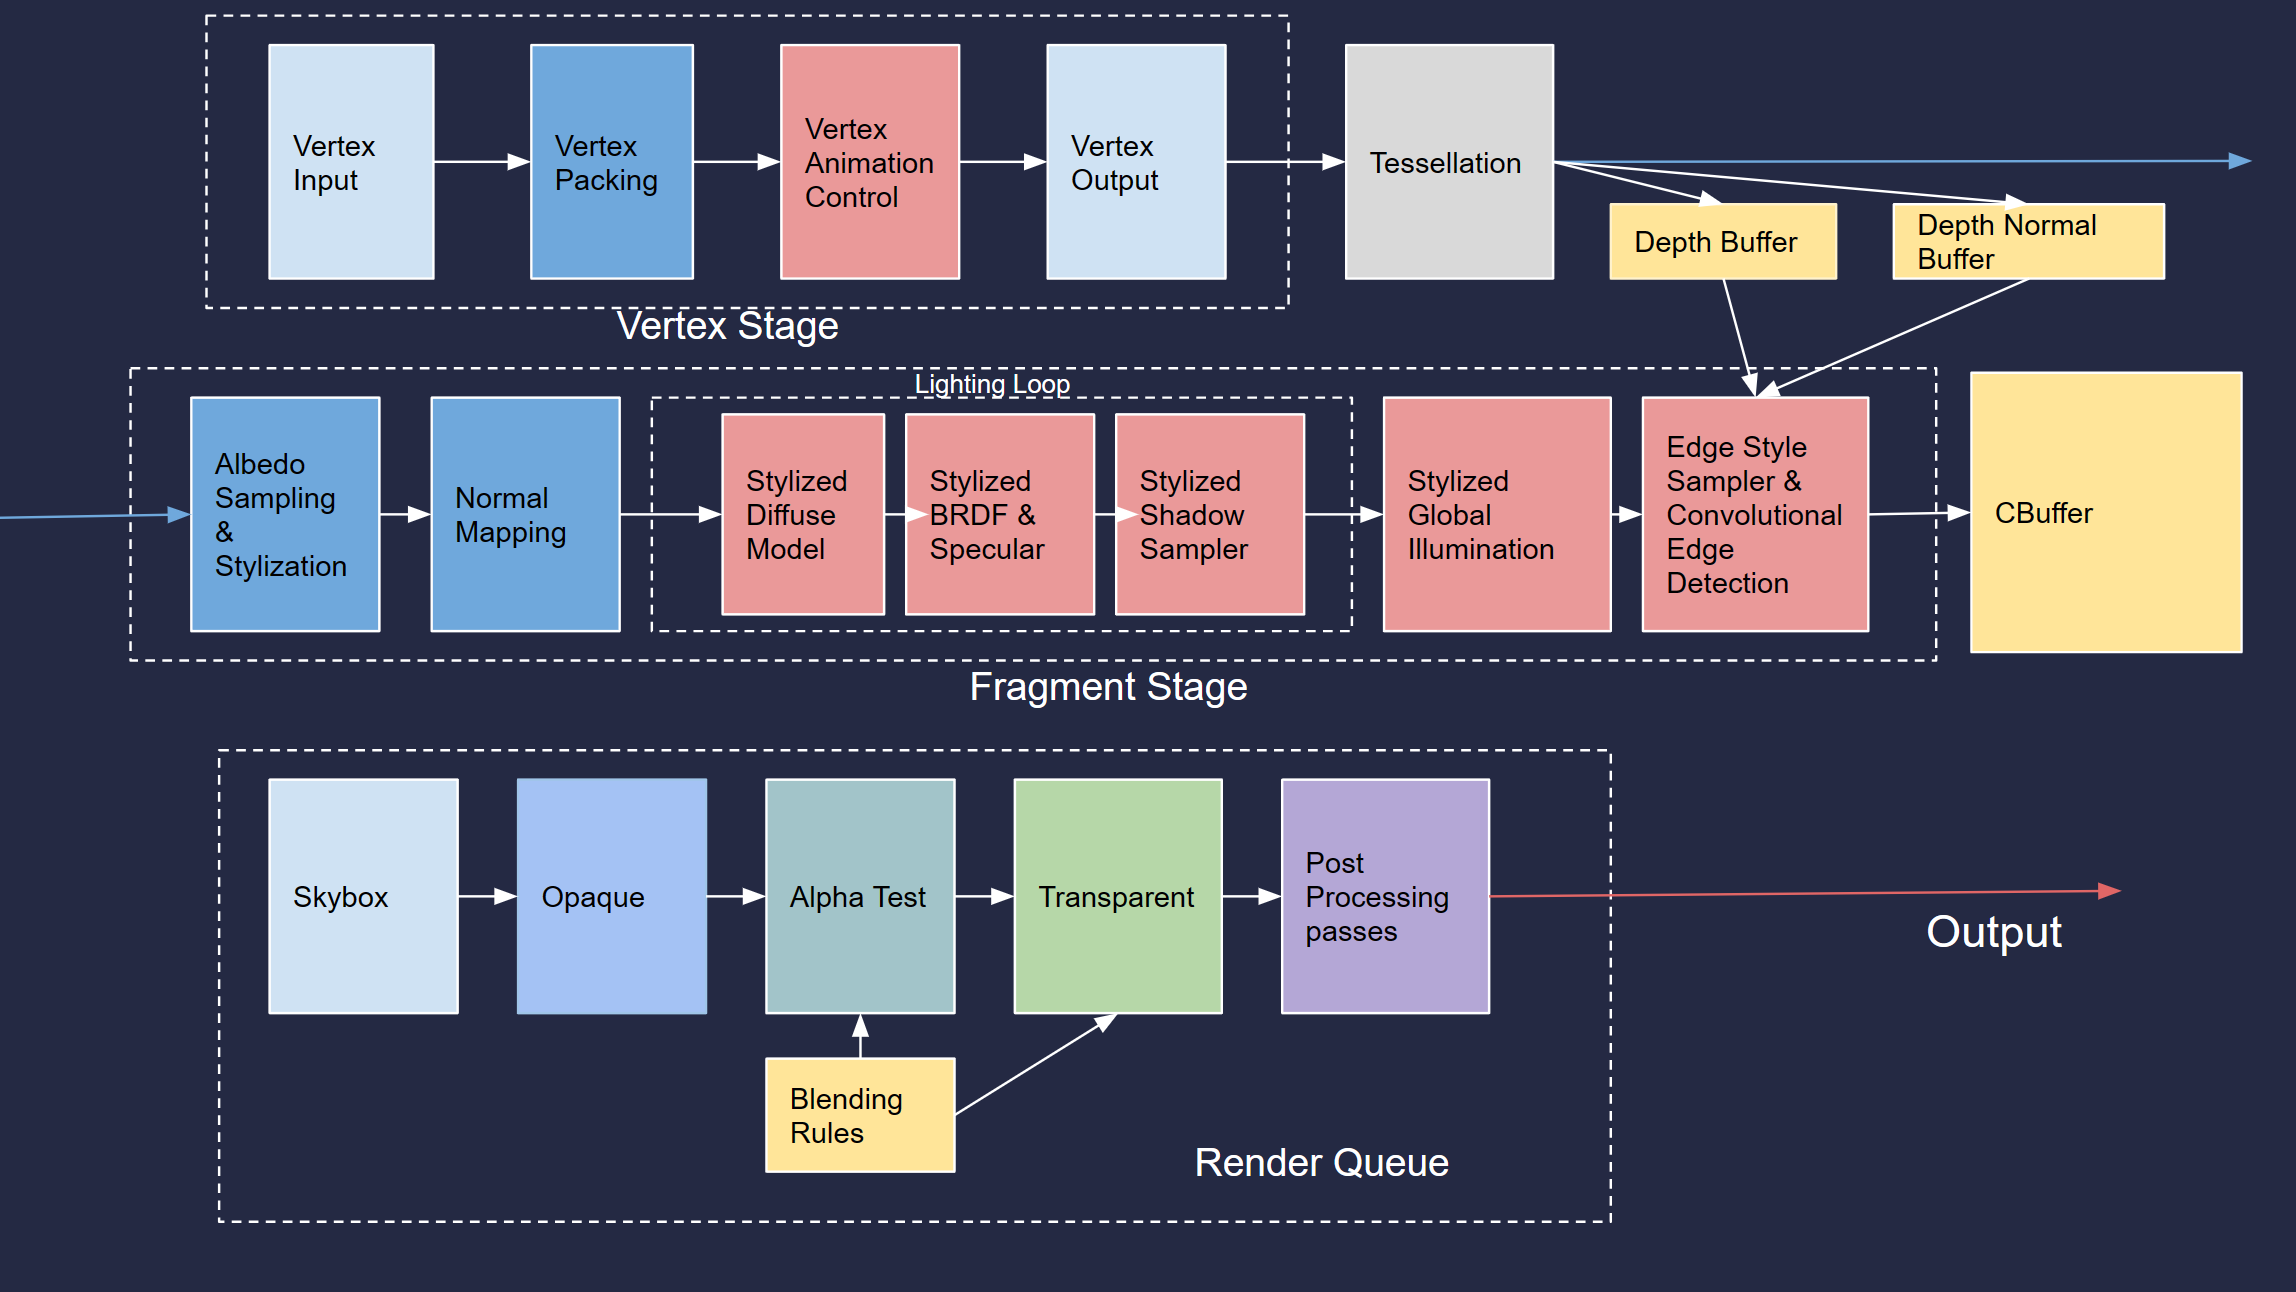
The whole pipeline is implemented as a forward rendering pipeline for maximum compatibility on hardwares and platforms. Each component is implemented independently and integrated into the render pipeline. The blue blocks are components that also exists in other lighting models (such as unity's default / PBR), while the red blocks are specifically for NPR rendering.
Component Implementation
In the section I'll briefly introduce some key components and how they are implemented. The components discussed will follow the order of the execution in the pipeline. It ensures modularization and single dependency flow to achieve the software engineering properties:
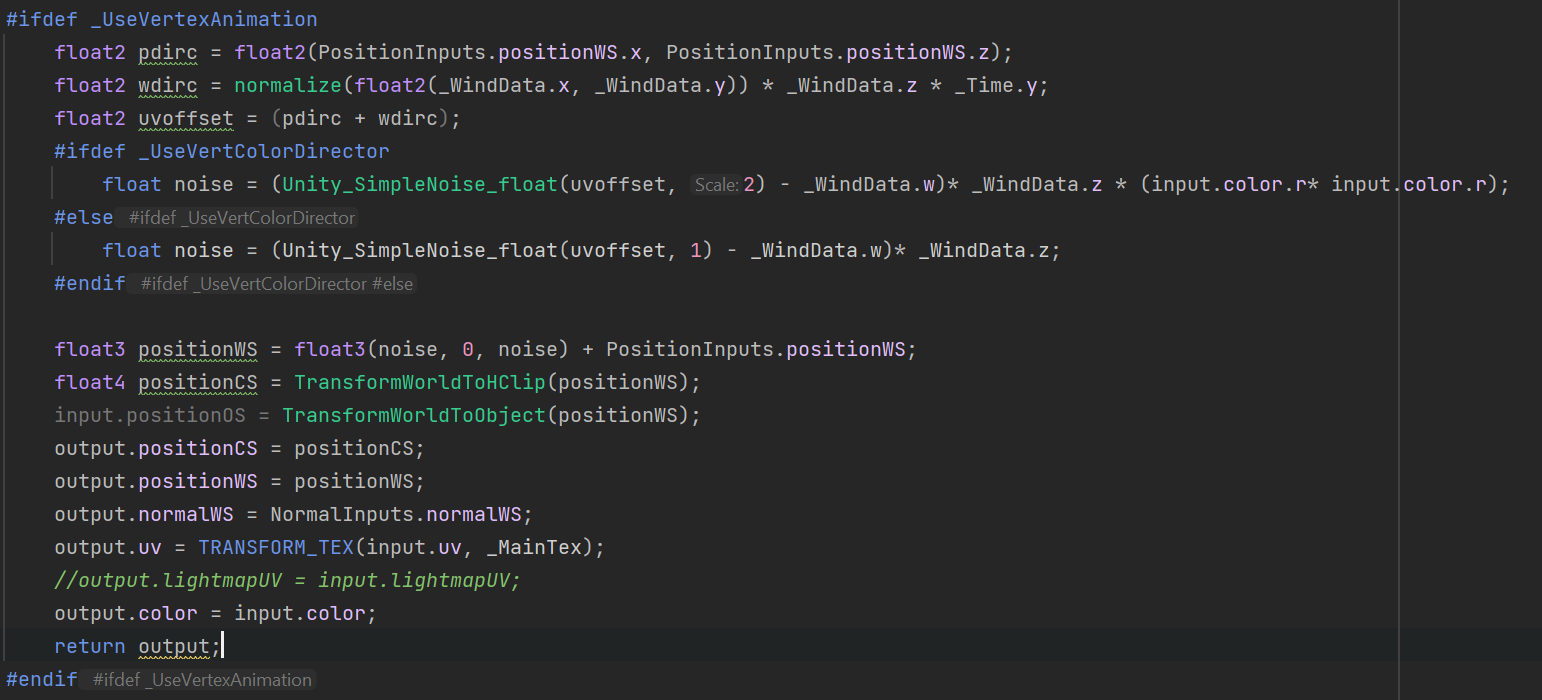
Vertex Animation Controller
The Vertex animation is controlled in the vertex stage. The component allows artists to control vertex movements at three dimensions using the Noise sampler. The component also offers two advanced features: (1) artists can use Vertex Color to achieve more detailed control over individual vertex. I use the method in the grass demo to build a gradient that makes the grass tip to swing faster and the root remains stable. (2) TAs can overload the noise sampler function to achieve more complex vertex animation.
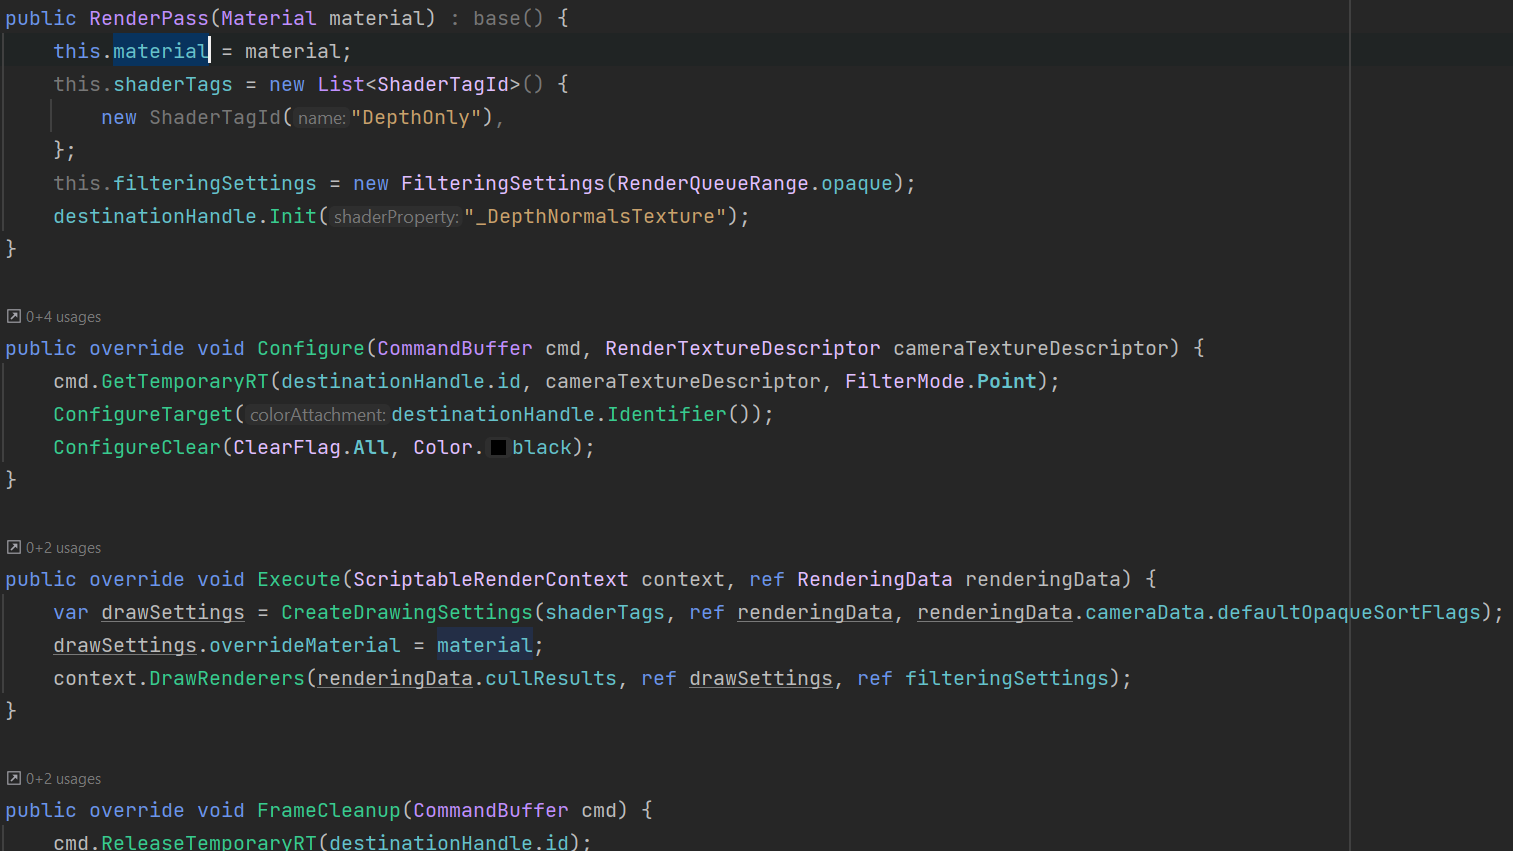
Depth and Depth Normal Sampling
After the vertex stage I made a hidden layer that extract depth and depth normals: two textures that are used commonly in stylized rendering (such as water refraction, edge detection...). Artists can use those intermediate data freely without worrying about how Unity pipelines work.
I implemented the feature by creating a new render pass and inserting it into the original GPU workflow.
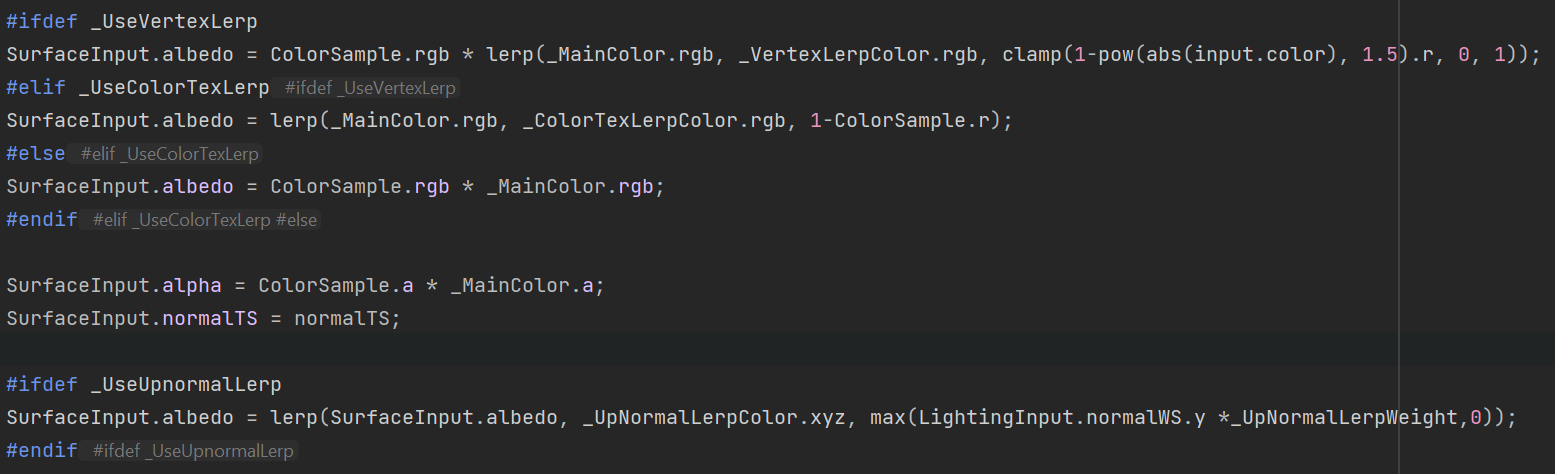
Albedo, Normal Map (and Other Maps) and Alpha Clip
Those are the basics in all render pipelines and I just need to implement them correctly. I implemented two additional features in the component: (1) allowing artists to use Vertex Color to dynamically control the albedo of a model, (2) allowing artists to control albedo based on normal direction. Those features allows for procedural textures and more efficient assets building (the grass and the rocks with grass on top in demo2 is made using those features).
Stylized Lighting Model
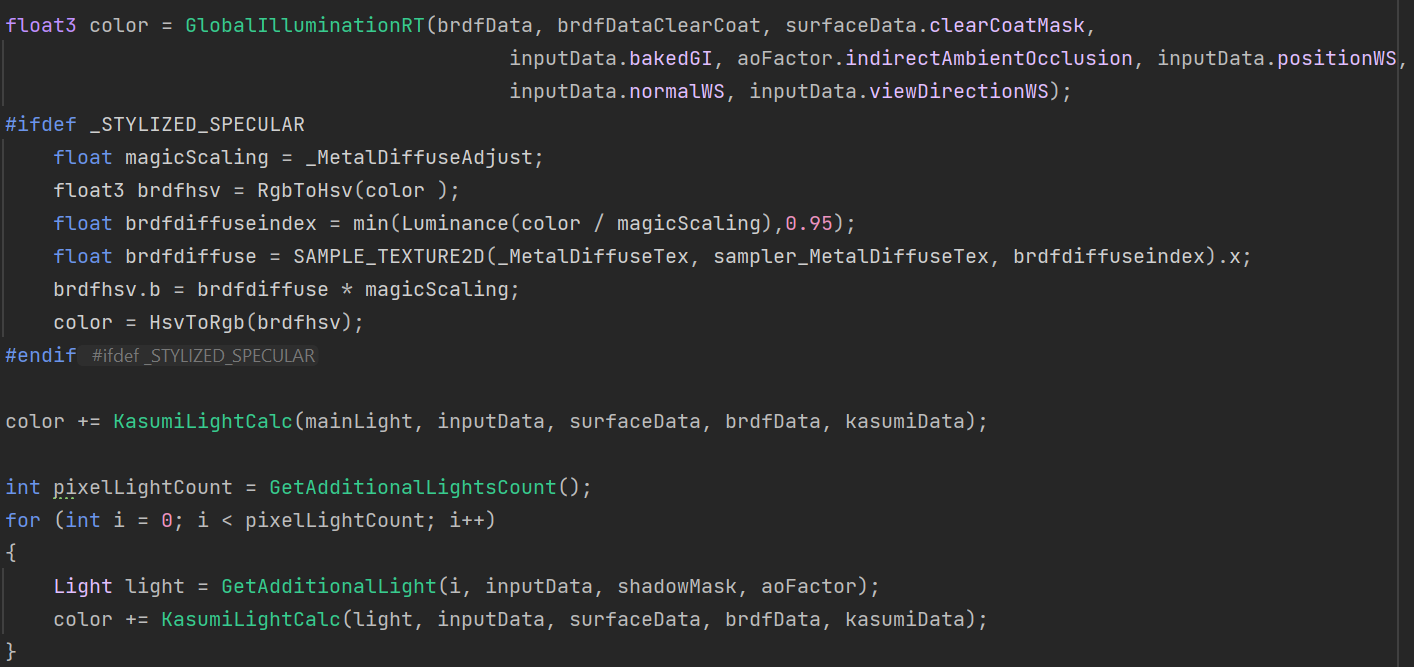
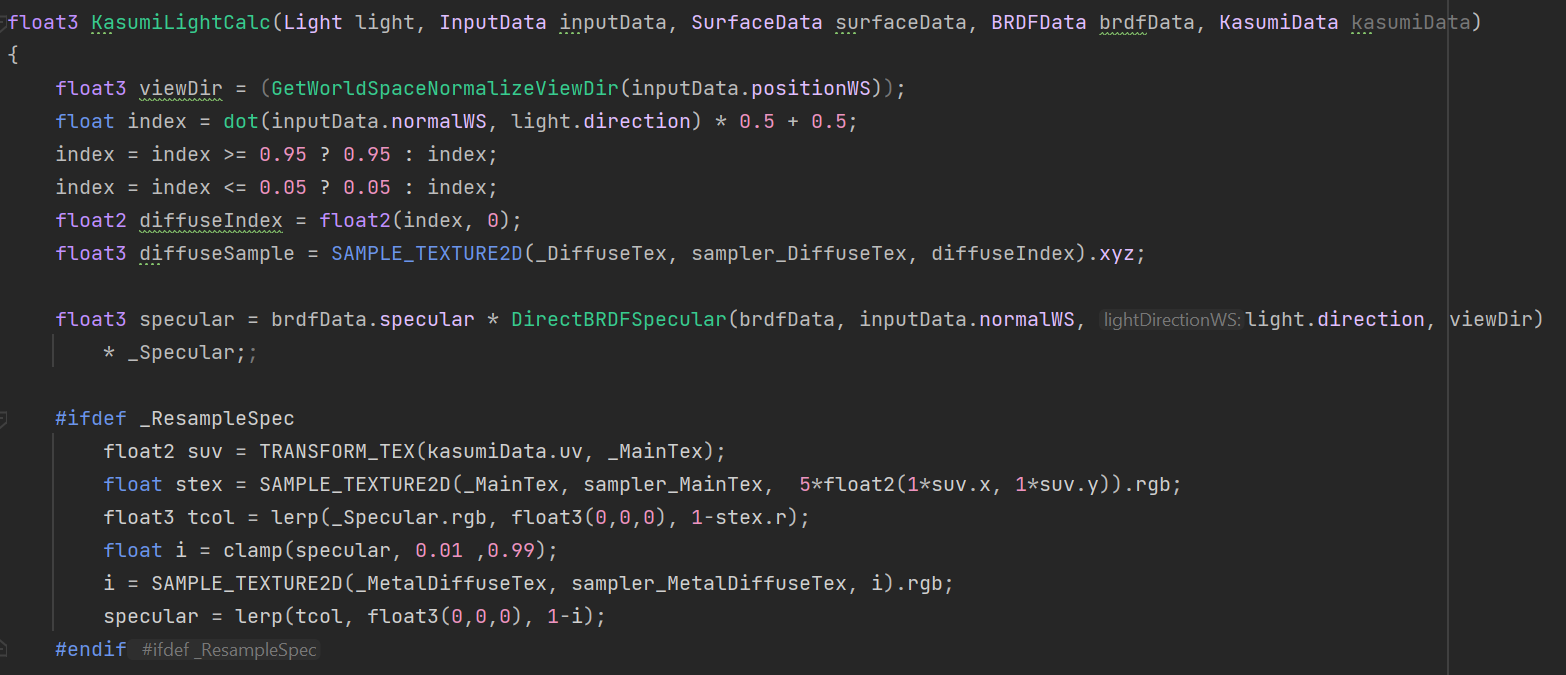
The first graph shows the basic workflow of the lighting model: The model first gets the GI data, followed by a optional stylization layer. Then it enters the main lighting loop where the base diffuse and BRDF is calculated for each light source based on the parameters that artists provide. Finally another layer is applied to control the style of specular.
The model supports traditional material data such as metal and smoothness. But the main stylization part is controlled by more complex data structures: the diffuse map, specular diffuse map and specular resample map. Artists can create those maps in 2D art softwares (Photoshop...) and the final stylized lighting (in CV terms: the foreshortening, the BRDF) as well as the specular shape is created by sampling light over these maps.
Each sub-component is implemented separately and has no dependence. Therefore can be easily upgraded for more features. It is the core part that makes the lighting model a "general" model.
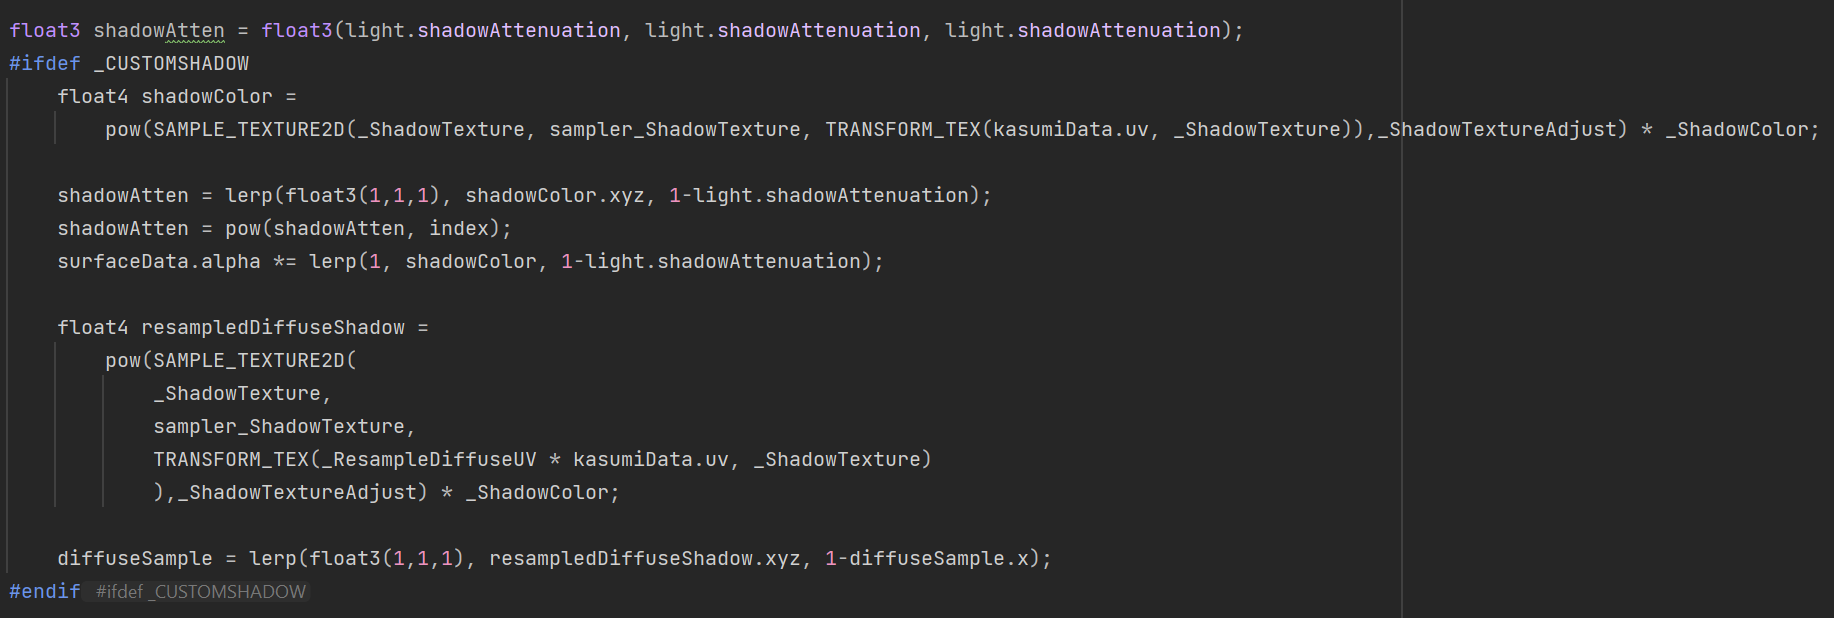
Stylized Shadow
Similar to the lighting model, the shadow model also samples from a shadow texture map to decide the final shadow pattern. It could be easily observed in demo3, especially the last part: the stripe shaped shadow of the character.
Stylized Outline
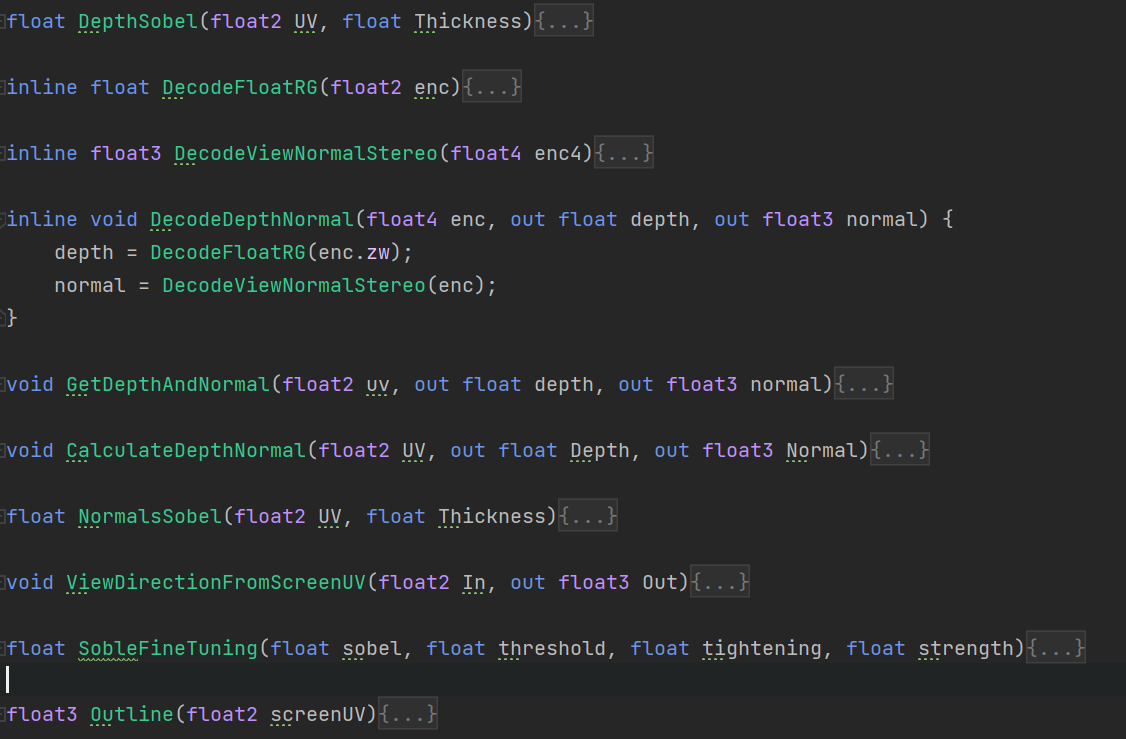
This is the (mathematically) most complex and difficult part, and I only shows the steps here in the screenshot due to its length. It works by using depth and normal data from textures in the previous step, processing this data through Sobel convolution matrices to detect changes in depth and normals (edges), and then using this information to generate outlines. The code ensures that the complex process of edge detection and outline generation is done efficiently.
Then the outline information could be directly apply as black lines. The component also supports further processes, such as change the color and thickness, or even apply other texture maps over it.
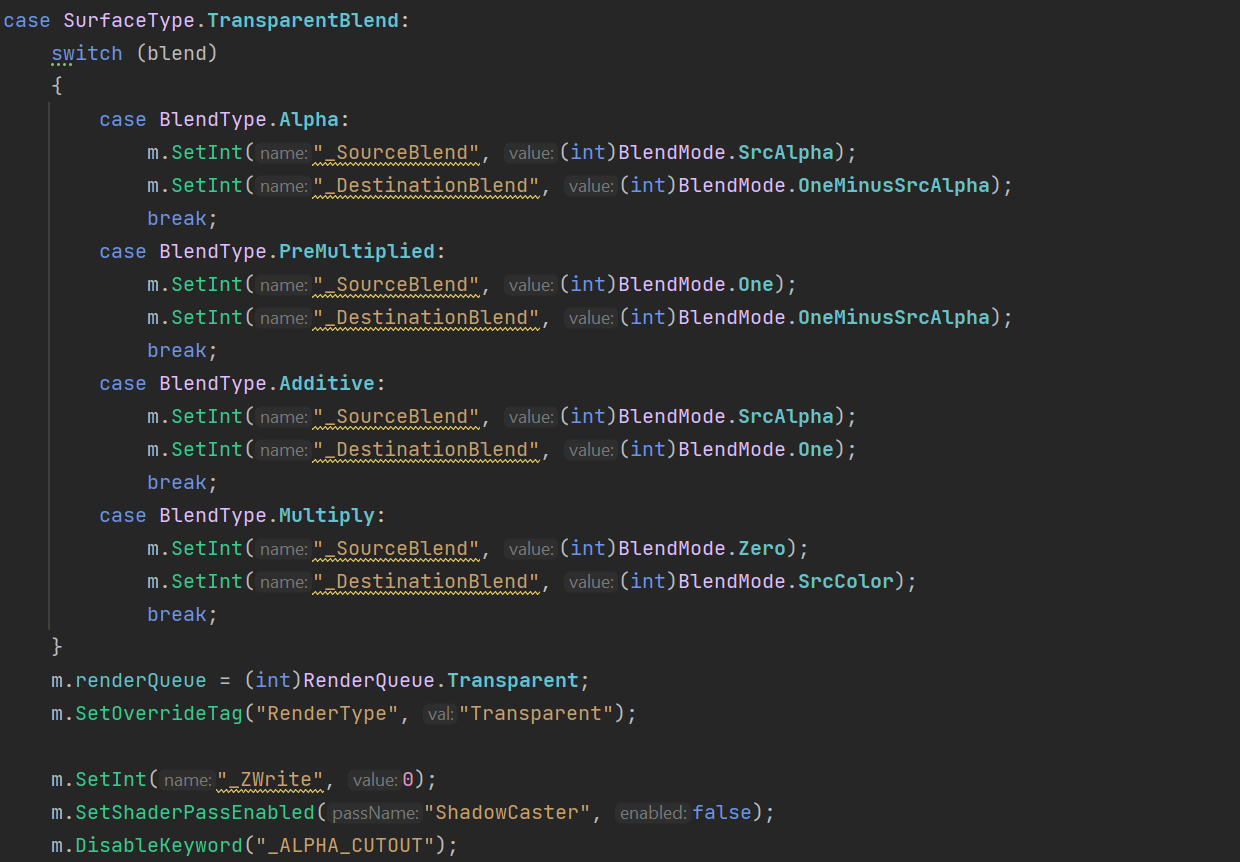
Blending Rules
Blending rule defines how a transparent object show blend with its background. Different types of objects (say, water vs firework) and different art styles use different blending rules. Here I built a framework that improves the efficiency for rule editing, as well as created four basic ones: the alphaBlend, Premultiplied, Additive and Multiplied.
FIN.